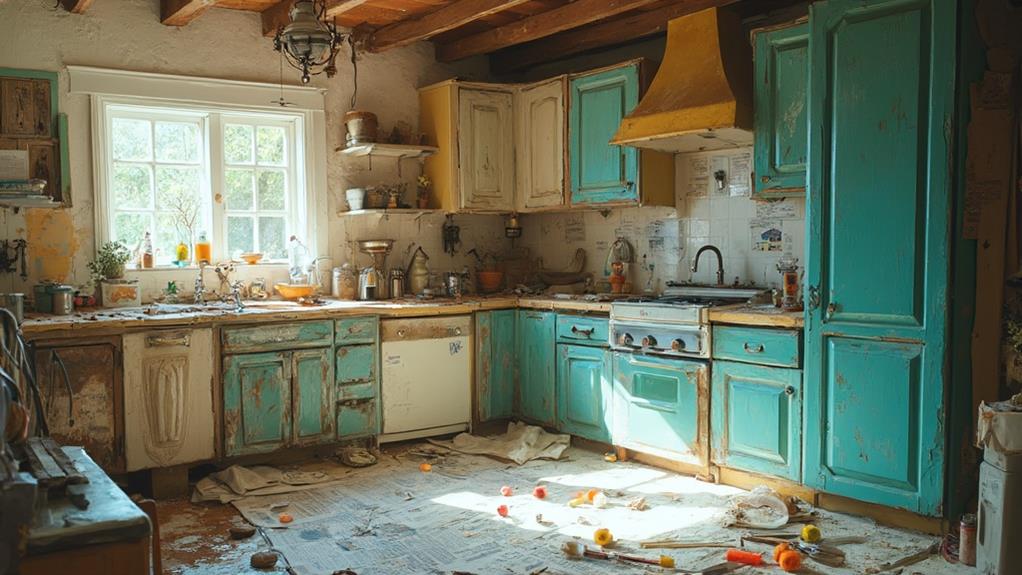
Budget-friendly cabinet makeovers can breathe new life into your kitchen without the expense of a full renovation. Paint transformations offer a classic approach, with options ranging from solid colors to two-tone designs and distressed finishes. Updating hardware provides an instant refresh, while converting to open shelving creates a modern, spacious feel. Decorative door inserts add visual interest and character, transforming plain cabinets into focal points. For a more comprehensive update, creative cabinet refacing allows for a complete overhaul of door and drawer fronts. These DIY-friendly techniques can yield professional-looking results with patience and attention to detail. Explore these options to discover how you can achieve a stunning kitchen transformation on a budget.
Paint Transformations

Three powerful paint transformations can breathe new life into tired cabinets without breaking the bank. The first is a classic solid color makeover, which involves thoroughly cleaning, sanding, and priming the cabinets before applying a fresh coat of paint. This method works well with both light and dark colors, allowing homeowners to dramatically alter their kitchen's appearance.
The second transformation is the two-tone approach, where upper and lower cabinets are painted in contrasting colors. This technique adds visual interest and can make a small kitchen appear larger. Popular combinations include white uppers with navy lowers or light gray uppers with charcoal lowers.
Finally, the distressed or antiqued look offers a rustic charm. After applying a base coat, strategically sand areas to reveal hints of the original wood or a contrasting undercoat. Finish with a glaze or wax to enhance the aged appearance.
When undertaking any of these paint transformations, proper preparation is crucial. Always use high-quality, kitchen-appropriate paints and primers to ensure durability and resistance to moisture and grease. With patience and attention to detail, these budget-friendly makeovers can yield professional-looking results.
Hardware Updates
Updating cabinet hardware is a simple yet effective way to refresh your kitchen's look without a complete overhaul. This budget-friendly option can dramatically alter the appearance of your cabinets and, by extension, your entire kitchen.
When selecting new hardware, consider the overall style of your kitchen. Modern kitchens benefit from sleek, minimalist pulls, while traditional spaces may call for ornate knobs. Brushed nickel, matte black, and brass are popular finishes that can instantly update your cabinets.
Measure your existing hardware carefully before purchasing replacements to ensure a proper fit. If you're changing from knobs to pulls or vice versa, you may need to fill old holes and drill new ones. For a cohesive look, choose hardware that complements other metal finishes in your kitchen, such as faucets or light fixtures.
Don't be afraid to mix and match hardware styles for added interest. Combine knobs and pulls, or use different sizes for upper and lower cabinets. Remember to clean and polish your new hardware regularly to maintain its appearance and extend its lifespan.
Open Shelving Conversions

A growing trend in kitchen design, open shelving conversions offer a fresh alternative to traditional upper cabinets. This budget-friendly makeover involves removing cabinet doors and, in some cases, the entire cabinet box to create open storage spaces. The process not only modernizes the kitchen's appearance but also increases accessibility and encourages organization.
To begin, remove the cabinet doors and hardware, then sand and paint the interior to match your desired aesthetic. For a more polished look, add trim to exposed edges or install new shelves for increased stability. Consider using reclaimed wood or sleek metal brackets for added character.
Open shelving allows for creative displays of dishware, cookbooks, and decorative items, turning everyday objects into design elements. However, it's crucial to maintain tidiness and consider dust accumulation. Regularly used items work best on open shelves, while less frequently accessed items can be stored elsewhere.
This conversion can make small kitchens appear more spacious and brighten the room by allowing more light to circulate. When planning your open shelving layout, maintain a balance between form and function to create an inviting and practical kitchen space.
Decorative Door Inserts
While open shelving offers a dramatic change, decorative door inserts provide a subtler yet equally impactful cabinet makeover. These inserts can transform plain cabinet doors into eye-catching focal points, adding texture, color, and visual interest to your kitchen.
Various materials can be used for door inserts, including glass, metal mesh, beadboard, and decorative panels. Glass inserts, available in clear, frosted, or textured options, create an illusion of space and allow for displaying attractive dishware. Metal mesh inserts offer an industrial or farmhouse aesthetic, while also providing ventilation.
Beadboard inserts add a classic, cottage-style charm, and decorative panels can introduce intricate patterns or designs.
Installing door inserts is a straightforward DIY project. First, remove the cabinet doors and measure the recessed area. Cut the chosen insert material to size and secure it with silicone adhesive or small clips. For a polished look, add trim molding around the insert's edges. When selecting inserts, consider your kitchen's overall style and color scheme to ensure a cohesive look. This budget-friendly upgrade can dramatically enhance your kitchen's appearance without the need for a complete cabinet replacement.
Creative Cabinet Refacing

Cabinet refacing offers a cost-effective alternative to full cabinet replacement, allowing homeowners to dramatically transform their kitchen's appearance. This process involves replacing or covering existing cabinet doors, drawer fronts, and exposed frames with new materials, while leaving the cabinet boxes intact.
Various materials can be used for refacing, including wood veneers, thermofoil, and laminate. Wood veneers provide a natural look and can be stained or painted to match any desired aesthetic. Thermofoil offers a durable, moisture-resistant option available in a range of colors and finishes. Laminate is an affordable choice that comes in numerous patterns and textures.
To further customize the look, consider updating hardware such as handles, knobs, and hinges. Mixing and matching different styles or finishes can create a unique, personalized appearance. Additionally, incorporating glass inserts or open shelving into select cabinet doors can add visual interest and showcase decorative items.
For a more dramatic transformation, combine refacing with other budget-friendly updates like painting the remaining exposed cabinet surfaces, installing under-cabinet lighting, or adding a new backsplash. These complementary changes can enhance the overall impact of the refacing project and create a cohesive, refreshed kitchen design.
Frequently Asked Questions
How Long Does a DIY Kitchen Cabinet Makeover Typically Take?
A DIY kitchen cabinet makeover typically takes 1-2 weeks for a standard-sized kitchen. The duration depends on factors like project scope, cabinet condition, chosen techniques, and available time. Proper planning and preparation can help streamline the process.
Can I Upcycle Laminate Cabinets, or Only Wood Ones?
Like Cinderella's transformation, laminate cabinets can indeed be upcycled. While wood cabinets are more versatile, laminate surfaces can be refreshed using specialized primers, paint, and techniques. The key is proper preparation and selecting appropriate products for lasting results.
What Tools Are Essential for a Successful Cabinet Upcycling Project?
Essential tools for a successful cabinet upcycling project include sandpaper, primer, paint brushes, rollers, screwdrivers, drill, level, measuring tape, and safety equipment like gloves and goggles. A paint sprayer can also enhance efficiency for larger projects.
Are There Eco-Friendly Options for Upcycling Kitchen Cabinets?
Nearly 70% of kitchen renovations involve cabinet updates. Eco-friendly options for upcycling kitchen cabinets include using low-VOC paints, reclaimed wood for refacing, and repurposing old cabinets into new furniture pieces to minimize waste and environmental impact.
How Much Money Can I Save by Upcycling Cabinets Instead of Replacing Them?
Upcycling cabinets can result in significant savings compared to full replacement. Homeowners can typically save 50-70% of the cost of new cabinets, depending on the extent of renovations and materials used for the upcycling project.
Conclusion
In the grand tapestry of home renovation, the kitchen stands as a fortress of culinary creation, its cabinets the weathered sentinels guarding family traditions. Through the alchemy of upcycling, these guardians can be transformed, their surfaces renewed with paint, their handles adorned with fresh hardware, and their very structure reimagined. Like a phoenix rising from ash, a dated kitchen can emerge reborn, its essence preserved yet elevated, proving that with creativity and resourcefulness, even the most modest budget can yield majestic results.